Connecting tp link to computer. How to set up a TP-Link N series router as an access point? Preparing a PC or Laptop for Setup
Hello! Now we will connect and configure the Tp-link TL-WR841N Wi-Fi router. If you have a TL-WR841ND model, then this instruction will also work for you. Let's consider the whole process of connecting a router, setting up the Internet, Wi-Fi networks and setting a password for a Wi-Fi network.
All this with a photo, and a detailed description. So you should not have any problems with setting up the Tp-link TL-WR841N router. Just follow the instructions.
A few words about Tp-link TL-WR841N (TL-WR841ND). A very successful model of Wi-Fi router, which is very popular. Indeed, a successful model, with an excellent price / quality ratio. It seems to me that for home use, an undemanding user cannot find a better router. I myself, in practice, checked the operation of the Tp-link TL-WR841N. It has been working fine for more than five years, distributing Wi-Fi to a large number of devices. It works very stably, I don’t even remember that the Internet would once disappear on it, or something else. You can read more about Tp-link TL-WR841N at. There you will find a short review, and my review.
If you have already bought this router, then it's time to move on to setting up. Let's do everything according to this scheme:
- Connecting a Tp-link TL-WR841N router.
- Setting up an Internet connection (WAN).
- Setting up a Wi-Fi network on TL-WR841N.
- Set a password to protect your Wi-Fi network.
- Change the admin password, which protects the router settings.
Tp-link connection TL-WR841N
Connect the power adapter to the router and plug it into a power outlet. If the indicators on the router do not light up, then turn on the power with the button located on the rear panel.
If you configure the router by cable (which is included), connecting it to a computer or laptop, then take a network cable and connect the computer to the router with it. On the router, connect the cable to the LAN connector (into one of 4):

We connect the second end of the network cable on the computer to the network card connector:


Connecting and configuring via Wi-Fi network
If you want to configure the router via Wi-Fi, and not when connected via cable, then just connect to the Wi-Fi network, which will appear immediately after turning on the power on the Tp-link TL-WR841N router. The network will be with a standard name (like this: "TP-LINK_084313"), and will not be protected.
You can even connect to this network from your tablet or phone and set up the router without a computer.
Included with the TL-WR841N, you probably found a disk. There is a utility to configure the router. So, we will configure without a disk, through the web interface of the router. In this manual, the disk will not be useful to us. If you want to configure through the utility from the disk, you can do it according to the instructions.
The router must be connected to the Internet. And your computer, tablet, laptop, etc. must be connected to Tp-link by cable, or by Wi-Fi. The power of the router must be turned on. If everything is ready, then you can proceed to the configuration.
The router settings will open.
And if the router has already connected to the provider and distributes the Internet, then you can continue the configuration.
Setting up a Wi-Fi network and setting a password on the Tp-link TL-WR841N router
To configure Wi-Fi, you need to open the tab on the settings page Wireless - Wireless Settings. On this page we need in the field Wireless Network Name think up and write down a name for your Wi-Fi network, and in the drop-down menu region choose the country where you live. Leave the rest of the settings as in my screenshot below.

To protect our wireless network with a password, go to the tab Wireless - Wireless Security. There you need to select the type of security WPA/WPA2 - Personal (Recommended).
In field PSK Password think up and write down a password that will protect your Wi-Fi network. You can read more about setting a password on the TL-WR841N router in the article.

Save settings by pressing the button Save.
Change admin password. Protecting router settings
I already wrote in a separate article about how in the settings of the router. Let's, while we are in the Tp-link TL-WR841N settings, immediately change the password that is used to protect the settings page. So that everyone who connects to your network cannot enter the router settings and change them.
Open a tab System Tools - Password. Enter your old username and password first (default - admin). Then enter your new username below (you can leave admin) and a new password. I advise you to write down this password somewhere, so as not to forget. Save settings with the button Save.

That's all, the configuration of the Tp-link TL-WR841N router is completed. It remains only to reboot the router. This can be done by turning the power off/on, or from the settings. On the tab System Tools - Reboot, you need to click on the Reboot button.
After setting up, and rebooting, a Wi-Fi network will appear, with the name that we set during the setup process. And to connect to the wireless network, use the password that we also set when setting up the router.
You can already connect your devices to the router. If you configured via cable, but want to connect via Wi-Fi, then the laptop can be disconnected from the router and connected wirelessly.
You can leave your feedback and questions in the comments!
Currently, unlimited high-speed Internet is no longer a novelty. And even more so when it comes to the wireless connection option, which is applicable even for a personal computer, not to mention laptops, tablets or smartphones. Now most mobile devices have a built-in WiFi module, and their comfortable use directly depends on how good the wireless connection is in your home and how well you can connect everything to your computer.
TP-Link WiFi routers are a good example of solving problems with speed, range and antenna power. Also, you are guaranteed to get rid of the wires in your apartment. After you have purchased a router, it is very important to understand how to properly connect the device to your computer on your own. The fact is that if you already have the Internet, then the lack of knowledge on this issue can lead to additional costs for calling specialists.
In the article, we will try to tell you how to properly connect your TP-Link to a computer and perform its subsequent configuration.
Connecting to a computer
First of all, you need to open the box and make sure that the bundle of the TP-Link router matches the one described in the documentation. That is, make sure that all the elements are in place. In addition to the router itself, you need a power supply, cables, and a software disk.
Before you connect a TP-Link router to your computer, you need to place it correctly. It's best to place the cable close to where your PC is, as the included cable isn't too long. If this fails, then you can purchase a longer cable additionally. It is very cheap and is sold in any electronics store.
The TP-Link router has the following buttons and connectors, most of which we will need when connecting and configuring:
- power button;
- WAN connector for connecting the router to the Internet;
- LAN connectors for connecting a PC using a network cable;
- turning off and on the QSS function;
- button to reset the router settings.
After you have familiarized yourself with the location of the connectors, you need to connect the power supply to the TP-Link router, and plug the unit into a power outlet. A cable is connected to the WAN socket located on the device case, which was carried out by the provider, that is, connecting directly to the Internet. The TP-Link configuration assumes at least four LAN ports, so you can connect four PCs at once if you use a network cable.
Setting up a TP-Link router
Before proceeding with the setup, experts recommend performing a preliminary reset to the factory settings. After the router has rebooted, use any browser. Enter 192.168.0.1 in the address bar. Another option is 192.168.1.1, depending on the firmware version. You will automatically access the Setup Wizard.
To get inside, enter your password and login. By default, both strings are admin. For further network security, it is best to change the password during the pre-configuration we are talking about right now. To change the input data, go to the System Tools tab, where you need to click on Password. In the fields Old User Name and Old Password, you will need to enter the factory login and password, that is, admin. Create a username and password. In principle, you can leave the old login. Enter new data in the fields New User Name, New Password, Confirm New Password. The last field is the confirmation of the new password. Don't forget to save the updates by clicking Save.
On the setup page, you can optionally download and install the latest firmware immediately. The installation itself is carried out through the System Tools menu, where you need to go to the Firmware Upgrade field. In it, click on Browse, select the downloaded file and click on Upgrade. Downloading must be carried out only from the official resources of TP-Link. Fully licensed firmware is provided absolutely free of charge.
Internet setup in the TP-Link router takes place in the Network and WAN menus. The first thing to do is select the network type. If it is unknown to you, then just clarify it by calling the provider's "Hot Line". After you have chosen the type, you will need to save the settings, for which you need to click on Save.
After successfully saving, go to the next tab labeled as MAC Clone. There is a Clone MAC Address button here, which you need to click on, and then save everything with Save.
How to set up a WiFi network on a tp link router
To set up a wireless connection, you need to go to the Wireless tab. There is a field labeled Wireless Network Name. The name of your network fits into it, and it can be chosen arbitrarily. If desired, you can enter the name of the country in the field below. Don't forget to save all changes.
The Wireless Security tab configures the security system, including protection against unauthorized access. To do this, you need to come up with a password that is not too simple and enter it in the PSK Password field.
All changes in the settings must be saved, after which the router must be rebooted. You need to reboot the device from the Reboot button located on the System Tools tab. After clicking on the button, you just need to confirm your action.
Conclusion
As you can see, there is nothing difficult in connecting and configuring the router on your own. It's really simple and doesn't take much time. And you can save money on calling specialists and the time during which you would have to wait for them.
TP-LINK is one of the leading manufacturers of network equipment. We will provide detailed information on how to connect or reconfigure a TP-Link router. The procedure for connecting the device, setting up for wired and wireless networks, changing the password, and updating the firmware will be covered. The information received will allow you to easily configure your home network in TP-Link routers.
What data is needed to connect the router
To change the parameters of the router itself, you will need two things: a browser and a password with a login for access. The latest data can be found on the label attached to the body of the device. As a rule, the standard login and password is the English word admin.
To use the Internet, you will also need authorization data, which you must obtain from your provider. However, they must be spelled out in the contract for the provision of services. They must be entered in a router or a specialized program, if such is provided by the provider. Be sure to find out the type of connection (PPPoE, L2TP, PPTP, and others) for proper setup. When using dynamic IP, you need to know your IP address, subnet mask, and the like. If all these parameters are already in hand, you can connect TP-Link.
How to connect the device to a network, PC or laptop
The procedure does not cause great difficulties, while it is performed for 5-10 minutes. Follow the steps of the following instructions one by one:

Models with Wi-Fi can be configured "over the air". This is true if you do not have the opportunity to connect the router to the computer via LAN. This completes the wiring. Further, the process continues in the web interface.
Login to the web interface
Manipulations with the modem are performed only in the web interface. You can get into it from a computer with a network cable connected or via Wi-Fi on a wireless model. Attention! You can use the interface at any time, even when the Internet is not working. Follow the steps below to sign in:
Router settings
Let's move on to the most interesting thing - changing the parameters of the router. There are more than 10 different sections in the main window. Most of them are not needed by the average user. Internet activation occurs in a maximum of two sections. Next, we will describe in detail how to set up a TP-Link router, how to create a wired connection, set up Wi-Fi, change the login password and other useful things.
Connecting to a wired network

The router has a quick setup feature. Beginners are recommended to use this section. Click the "Next" button and follow the installer's prompts:

When setting up other types of connections, fields for entering a login and password will appear. Here you need to enter the data that the provider will give. The user can change the settings in the "Network" section. In some TP Link models, next to the choice of connection type, there is a "Define" button that will help you find out your type. Based on the WAN, the corresponding characteristics are already configured. 
For example, to use PPPoE, fields for login/password and parameters specific to PPPoE already appear in the window.

Connecting via a wireless network
For devices with a Wi-Fi module, you will also need to set up a wireless connection. This can be done during quick setup (the penultimate paragraph involves the introduction of all important parameters).

Let's see what Wi-Fi settings on the TP-Link router should be changed. Broadcast should be set to "on". The SSID or network name is what will be displayed on other devices when searching. Specify your region, mixed mode. Leave the channel and its width automatically. Advanced users can choose it themselves, taking into account the busy channels of neighboring routers. If you want to put a password on the access point, select the WPA2-PSK security type. In conclusion, it remains to enter only the password from the wireless network point. Click the "Next" button and complete the process.
Similar settings are located in the "Wireless Mode" section. To change the SSID or channel settings, select the "Wireless Settings" sub-item. You can change the password in the "Wireless Security" item. For any changes, do not forget to click the "Save" button. If the selected options have not changed, reboot the machine.

Through these menu items, TP-Link routers are configured.
Changing the password for logging into the web interface
All owners are advised to change the standard password and login from the router. This is due to the fact that an attacker, in the absence of a Wi-Fi password or hacking it, will be able to enter the modem parameters and “have fun”. Eliminating the created problems is not difficult, but it is better to avoid this. The interface allows you to quickly and conveniently change the input data:

If you have forgotten your login information, perform a factory reset.
Advanced Settings
The router has a lot of additional features that expand its capabilities. Consider some of the advanced settings:
- Guest network. Allows you to configure a public guest network, limit incoming / outgoing traffic or work time.
- Address change. It allows you to set static IP addresses or use DHCP.
- Forwarding - setting up virtual addresses, web telephony, conferences and the like.
- Parental control features. Limit Internet access time or specific resources.
- Setting the routing table manually (for specialists).
- Binding MAC addresses to specific IPs.
You can learn more about how to configure the specific functions of the TP-Link router in the user manual.
VPN
This technology allows you to hide information from prying eyes. Encryption is performed, so even the provider will not be able to track your visits. However, only those models on which a VPN server is preinstalled can use VPN. You can perform setup by the following steps (for English firmware).
In this guide, we will show you in detail how to set up a TP-Link router. The TP-Link Wi-Fi router is available in several versions, and for writing this article, we used the TP-Link WR841 N version router as an example. However, this instruction is quite suitable for the following models: TP-Link TL-WR740N and TP-Link TL -WR741N. You should not close the page, even if you have a TP-Link WiFi router of a different modification. In any case, there will be no significant differences, so we read the article and repeat all the steps according to the instructions.
As for connecting the TP-Link router, the scheme here is standard: We connect the router to the mains, insert the cable from the Internet provider into the WAN port, connect the network cable from the computer to the LAN jack.

You can read more about the general rules for installing and connecting a router of any model. So, there should be no questions regarding the connection, so we can immediately start setting up the TP-Link router.
Setting up a TP-Link router
Before setting up a TP-Link router, it is advisable to reset the existing settings. This is done quite simply. Each router has a special button for resetting the router settings "Reset". We press this button and hold for about 30 seconds, after which the router should reboot and the settings will be reset.
Now you can start configuring the router. To do this, you need to get into the web interface of the router. To do this, open any browser and enter 192.168.0.1 in the address bar. If the login failed, try to enter 192.168.1.1.
Note: The login address to the router interface may differ depending on the firmware installed on the device. Usually, initially, entry is made through 192.168.0.1, and after a firmware update, through 192.168.1.1.
After going to the above address, a window will appear in front of you in which you need to enter your username and password. For TP-Link routers, the default login is “admin” and a similar password. If the default password and login are not suitable, then look at the documentation of the router, it will definitely contain all the necessary information. Also, information for entering the settings web interface is available on a sticker on the bottom of the Wi-Fi router.

So, after entering the login and password, click "send" and get into the web interface of the Wi-Fi router, here we will perform all the necessary settings. First of all, we need to update the TP-Link firmware to the latest version. Before downloading the firmware, you need to determine the hardware version of our router. It will be listed on the back of the router.

In our case, the version "Ver: 7.2" is used, therefore, we need to download it. You may have a different hardware version, but the essence of this does not change. We go to the site http:// www.tp-linkru.com and enter the model of our Wi-Fi router into the search bar on the site, as mentioned earlier, our instructions are based on the example of the TP-Link WR841 N router. You enter your model and click find. Select the appropriate model from the list. Next, look for the "Downloads" tab, go to it. Now we need the "Software" section, where we need to select the "Firmware" item. Here we look for the hardware version of your device and download the first firmware in the list. Unzip the firmware file to the computer and return to the wifi router settings menu.
Now we need to install the latest firmware we just downloaded. To do this, go to the "System Tools" section and select the "Firmware Upgrade" item. Now click "Browse" and specify the path to the firmware file, then click "Upgrade". Next, the router will automatically update the firmware and you will find yourself on the main page of the web interface.

Now you can proceed to the basic settings of the TP-Link router. Let's start by changing the login and password to enter the router settings. To do this, open the “System Tools” section, select the “Password” item and enter the desired data, then click on the “Save” button for all settings to take effect.

How to set up Internet on a TP-Link router
Half the job is done. Now you need to complete the network settings. To do this, we are looking for the “Network” section in the main menu of the interface, after which we select the “WAN” item, where we need to select the type of network. The type of connection depends on which ISP you use. You can find out the necessary information in the contract with the provider or on the official website of the service provider.

After selecting the network type, go to the "MAC Clone" tab, where you need to select the "Clone MAC Address" item and click the "Save" button.

How to set up a Wi-Fi network on TP – Link
In principle, the Internet should appear after performing the above steps, however, we recommend that you also configure the Wi-Fi network. To do this, look for the “Wireless” section and in the “Wireless Network Name” field indicate the desired name of your Wi-Fi network.

We save the settings and go to the "Wireless Security" section. Here we need to configure the security settings of our Wi-Fi network, that is, come up with a password. In principle, you can not change anything, but then anyone can connect to your Wi-Fi network, so it’s better to set a password anyway. To do this, enter the desired password in the PSK Password field.


If everything is done correctly, then there should be no problems with Internet access. Now you know how to set up a TP-Link router, if you have any questions, ask them in the comments or in the "ask a specialist" section.
Select your Internet technology:
1. Preparing for setup
WPS/RESET


-
Select an item on the left Network (Network), then wan.
In point should be a value We press the button Save and wait about a minute.
3. Setting up a wi-fi network.
Next, go to the tab then
In field Wireless network name (SSID)
Meaning Channel install Auto (Auto).
Meaning Mode install
Meaning install Auto (Auto).
Save
Next, go to the subsection
Select point point
Meaning Version select Automatic (Automatic).
Meaning Encryption select Automatic (Automatic).
In field PSK Password
Save
Hello! Now we will configure the TP-Link router.
1. Preparing for setup
If the router is not new and has already been used before, reset the router to factory settings. To do this, turn on the router in power and hold down the button WPS/RESET for 30 seconds. After that, you need to wait about a minute.
Connect the internet cable to the blue socket. Connect your computer to one of the yellow connectors.
If it is not possible to connect the router to a computer, then you need to open the list of wireless networks on your device and connect to the TP-Link_XXXX network. If the network asks for a password, enter the PIN from the sticker on the router.
After connecting to the router, open an Internet browser (Google Chrome; Mozilla Firefox; Opera; Internet Explorer; Safari) in the address bar (not in the search!) Type 192.168.0.1 and press Enter
You can also see the login information on the sticker on the bottom of the router:
2. Setting up access to the Internet.
Select an item on the left Network (Network), then wan.
In point WAN Connection Type should be a value Dynamic IP address (Dynamic IP).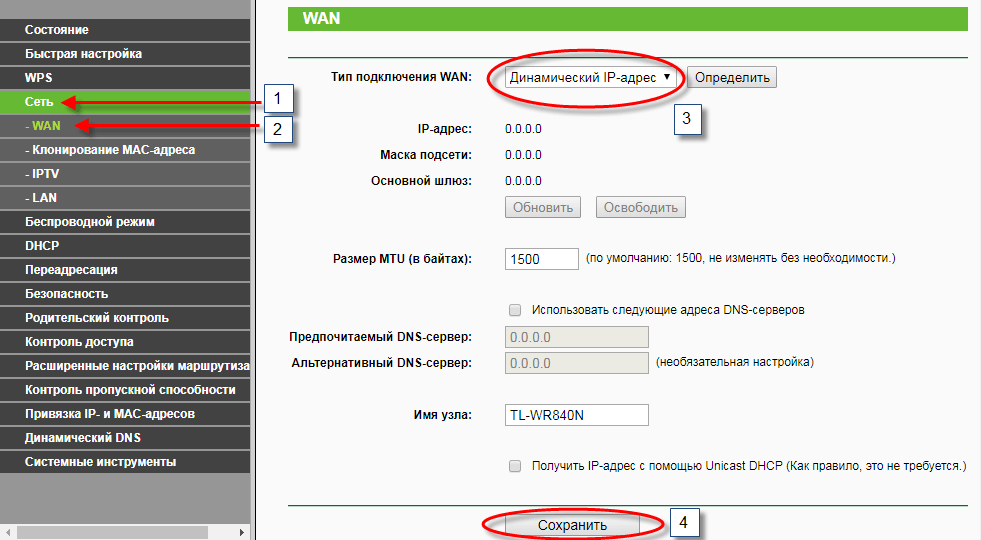
Choose an item Network (Network), then MAC address cloning (MAC Clone).
If you are setting up the router on a computer that connects to the router via a cable, click the button Clone MAC address (MAC Clone)(only if this computer has access to the Internet when connected without a router directly!).If you are setting up a router on a device that connects to the router via wi-fi, in the WAN MAC Address field, enter the MAC address registered under the agreement. Click the Save button.

What MAC address you can enter on the router on the subscriber's portal "My Account". After authorization on the subscriber portal, select the item At the top, select "Equipment". In field Device MAC addresses the MAC address bound by the contract is indicated, which must be registered on the router.

3. Setting up a wi-fi network.
Next, go to the tab Wireless mode (Wireless), then Wireless Settings.
In field Wireless network name (SSID) enter the name of your network in Latin letters and/or numbers.
Meaning Channel install Auto (Auto).
Meaning Mode install 11bgn mixed (11bgn mixed).
Meaning Channel Width install Auto (Auto).
Click the button at the bottom of the page SaveIf the connection to the network is lost, wait about a minute and connect to the network with your name.
Next, go to the subsection Wireless mode (Wireless), Protection of the wireless mode (Wireless Security).
Select point point WPA-Personal/WPA2-Personal (Recommended).
Meaning Version select Automatic (Automatic).
Meaning Encryption select Automatic (Automatic).
In field PSK Password enter the password for your WI-FI network in Latin letters and / or numbers. Must be at least 8 characters.
Click the button at the bottom of the page SaveSettings completed. Reboot your router. Connect to your network and use the internet.
Hello! Now we will configure the TP-Link router.
1. Preparing for setup
If the router is not new and has already been used before, reset the router to factory settings. To do this, turn on the router in power and hold down the button WPS/RESET for 30 seconds. After that, you need to wait about a minute.
Connect the internet cable to the blue socket. Connect your computer to one of the yellow connectors.
If it is not possible to connect the router to a computer, then you need to open the list of wireless networks on your device and connect to the TP-Link_XXXX network. If the network asks for a password, enter the PIN from the sticker on the router.
After connecting to the router, open an Internet browser (Google Chrome; Mozilla Firefox; Opera; Internet Explorer; Safari) in the address bar (not in the search!) Type 192.168.0.1 and press Enter
You can also see the login information on the sticker on the bottom of the router:
2. Setting up access to the Internet.
Choose an item Network (Network), then wan.
In point WAN Connection Type should be a value PPPoE/PPPoE Russia (PPPoE/Russia PPPoE). In field Username enter the login that is issued upon connection. In field Password And Confirm password (Password Confirm) enter the password for the subscriber portal. We press the button Save and wait about a minute
3. Setting up a wi-fi network.
Next, go to the tab Wireless mode (Wireless), then Wireless Settings.
In field Wireless network name (SSID) enter the name of your network in Latin letters and/or numbers.
Meaning Channel install Auto (Auto).
Meaning Mode install 11bgn mixed (11bgn mixed).
Meaning Channel Width install Auto (Auto).
Click the button at the bottom of the page SaveIf the connection to the network is lost, wait about a minute and connect to the network with your name.
Next, go to the subsection Wireless mode (Wireless), Protection of the wireless mode (Wireless Security).
Select point point WPA-Personal/WPA2-Personal (Recommended).
Meaning Version select Automatic (Automatic).
Meaning Encryption select Automatic (Automatic).
In field PSK Password enter the password for your WI-FI network in Latin letters and / or numbers. Must be at least 8 characters.
Click the button at the bottom of the page SaveSettings completed. Reboot your router. Connect to your network and use the internet.


